
7. Introduction to Mapping with JOSM#
7.1. Overview#
Welcome to Course 7 of the Youthmappers Academy Advanced Track. In this module, we will take a look at JOSM, or the Java OpenStreetMap Editor. JOSM is a powerful desktop editing application for OpenStreetMap, written in Java, which provides a whole host of advanced editing tools for working with OSM data. JOSM is also the preferred tool for validation in OSM (we’ll talk a little more about validation in the next module). Apart from the advanced editing functionality of JOSM, one of its primary benefits is that it allows you to download and work on OSM data offline, which is incredibly beneficial in low/no bandwidth areas.
If you have been following the YouthMappers Academy learning track, you will already be familiar with iD Editor from Course 2, and with the OSM data model from Course 4. This course builds on both of those foundations. If you have not yet completed those courses, we recommend doing so before proceeding.
By the end of this course, you will be able to:
Install and configure JOSM on your operating system
Navigate the JOSM interface, including its toolbars, panels, and preferences
Use JOSM’s drawing and tagging tools to map nodes, ways, and areas
Download, edit, and upload real OSM data using JOSM
Identify and resolve common upload errors
7.2. What is JOSM?#
7.2.1. Overview#
Java OpenStreetMap Editor (JOSM) is an advanced desktop editing application for OpenStreetMap, written in Java. It runs on Windows, macOS, and Linux operating systems, so is widely accessible regardless of your setup. Mappers “check-out” or “download” OSM data to edit offline (which is a huge advantage in low bandwidth areas). When editing is complete, mappers “push” or “upload” their data back to the OSM server. There are built-in checks as part of the re-upload process to check for correct geometry and complete tagging. While JOSM supports the editing and re-upload of existing nodes, ways, tags, and relations that have been downloaded from the OSM database, it also supports the editing of stand-alone GPX tracks and GPX track data, before this data is added to OSM.
7.2.2. How does JOSM compare to iD Editor?#
If you completed Course 2, you are already comfortable mapping in iD Editor. The table below summarizes the key differences to help you understand where JOSM fits in your mapping toolkit:
Feature |
iD Editor |
JOSM |
|---|---|---|
Platform |
Browser-based |
Desktop application |
Setup required |
None |
Installation + Java required |
Offline editing |
❌ |
✅ |
Learning curve |
Lower |
Higher |
Editing efficiency |
Moderate |
High |
Keyboard shortcuts |
Limited |
Extensive |
Validation tools |
Basic |
Advanced |
Best for |
Beginners, quick edits |
Experienced mappers, large tasks |
The JOSM interface has more moving parts than iD Editor, and it may take a little time to get used to it. Most mappers, however, find that once they have built familiarity with JOSM’s tools and shortcuts, their mapping speed and accuracy improve significantly.
7.3. JOSM Installation#
7.3.1. Before You Begin: System Requirements#
Before installing JOSM, make sure your machine meets the following minimum requirements:
Requirement |
Minimum |
|---|---|
Operating System |
Windows 8+, macOS 10.12+, or Linux |
Java Version |
Java 17 or later |
RAM |
2 GB minimum, 4 GB recommended |
Disk Space |
~200 MB |
Warning
Important: JOSM requires Java 17 or later to function correctly. If you are running an older version of Java, JOSM will either fail to launch or behave unexpectedly. Before installing JOSM, verify your Java version at JOSM Installation Files and update (if necessary), or, wait for the prompt during the JOSM installation, which will also alert you to update your Java (if necessary).
7.3.2. Downloading JOSM#
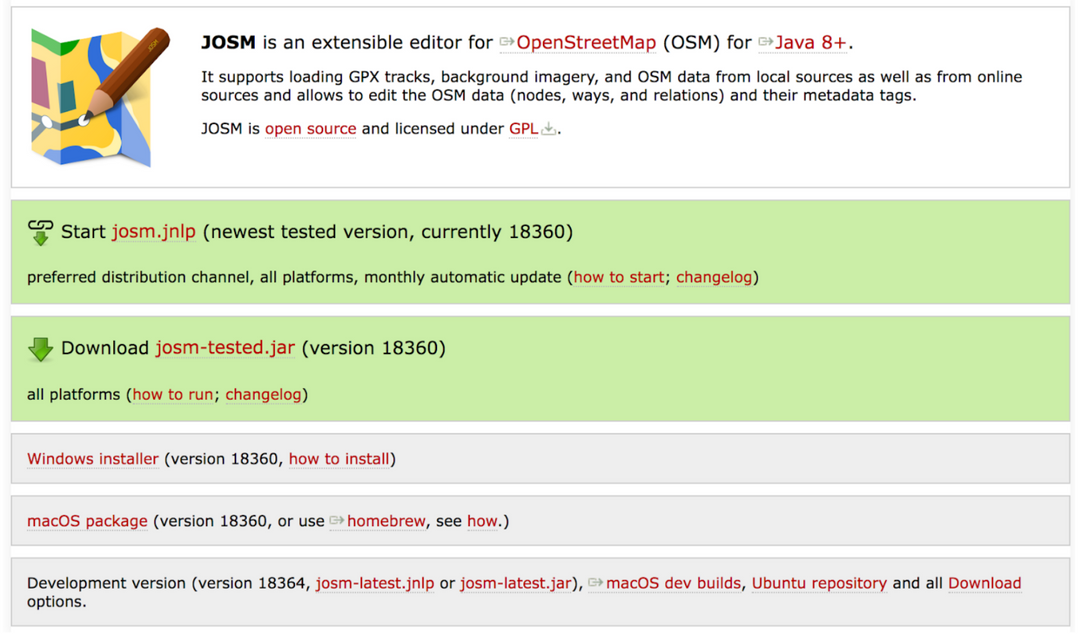
Visit the official JOSM download page at JOSM Installation Files and download the appropriate version for your operating system.
There are two main categories of installation available to the user:
The josm.jnpl option, also known as the “web start” option, allows users to start the application software directly from the internet using a web browser. The main benefit of this option is seamless version updating and greater control of memory allocation.
The josm-tested.jar version is the standard desktop installation (which works across all operating systems), but you can also click on the dedicated install links for certain popular OS (windows/macOS) from the front page.
7.3.2.1. So Which One Should I Choose?#
Every regular JOSM user has a preference for one installation or another. I’ve tried both (.jnpl and dedicated OS install), and both have worked equally well for me. More recently I’ve opted for the .jnpl install, as the automatic updates are a really nice feature. For someone who uses JOSM regularly, it really does cut down on maintenance.
Tip
When in doubt, choose the native installer for your OS. It is the most straightforward path to a working JOSM installation.
7.4. Navigating the JOSM Interface#
7.4.1. Overview#
7.4.1.1. Launch JOSM#
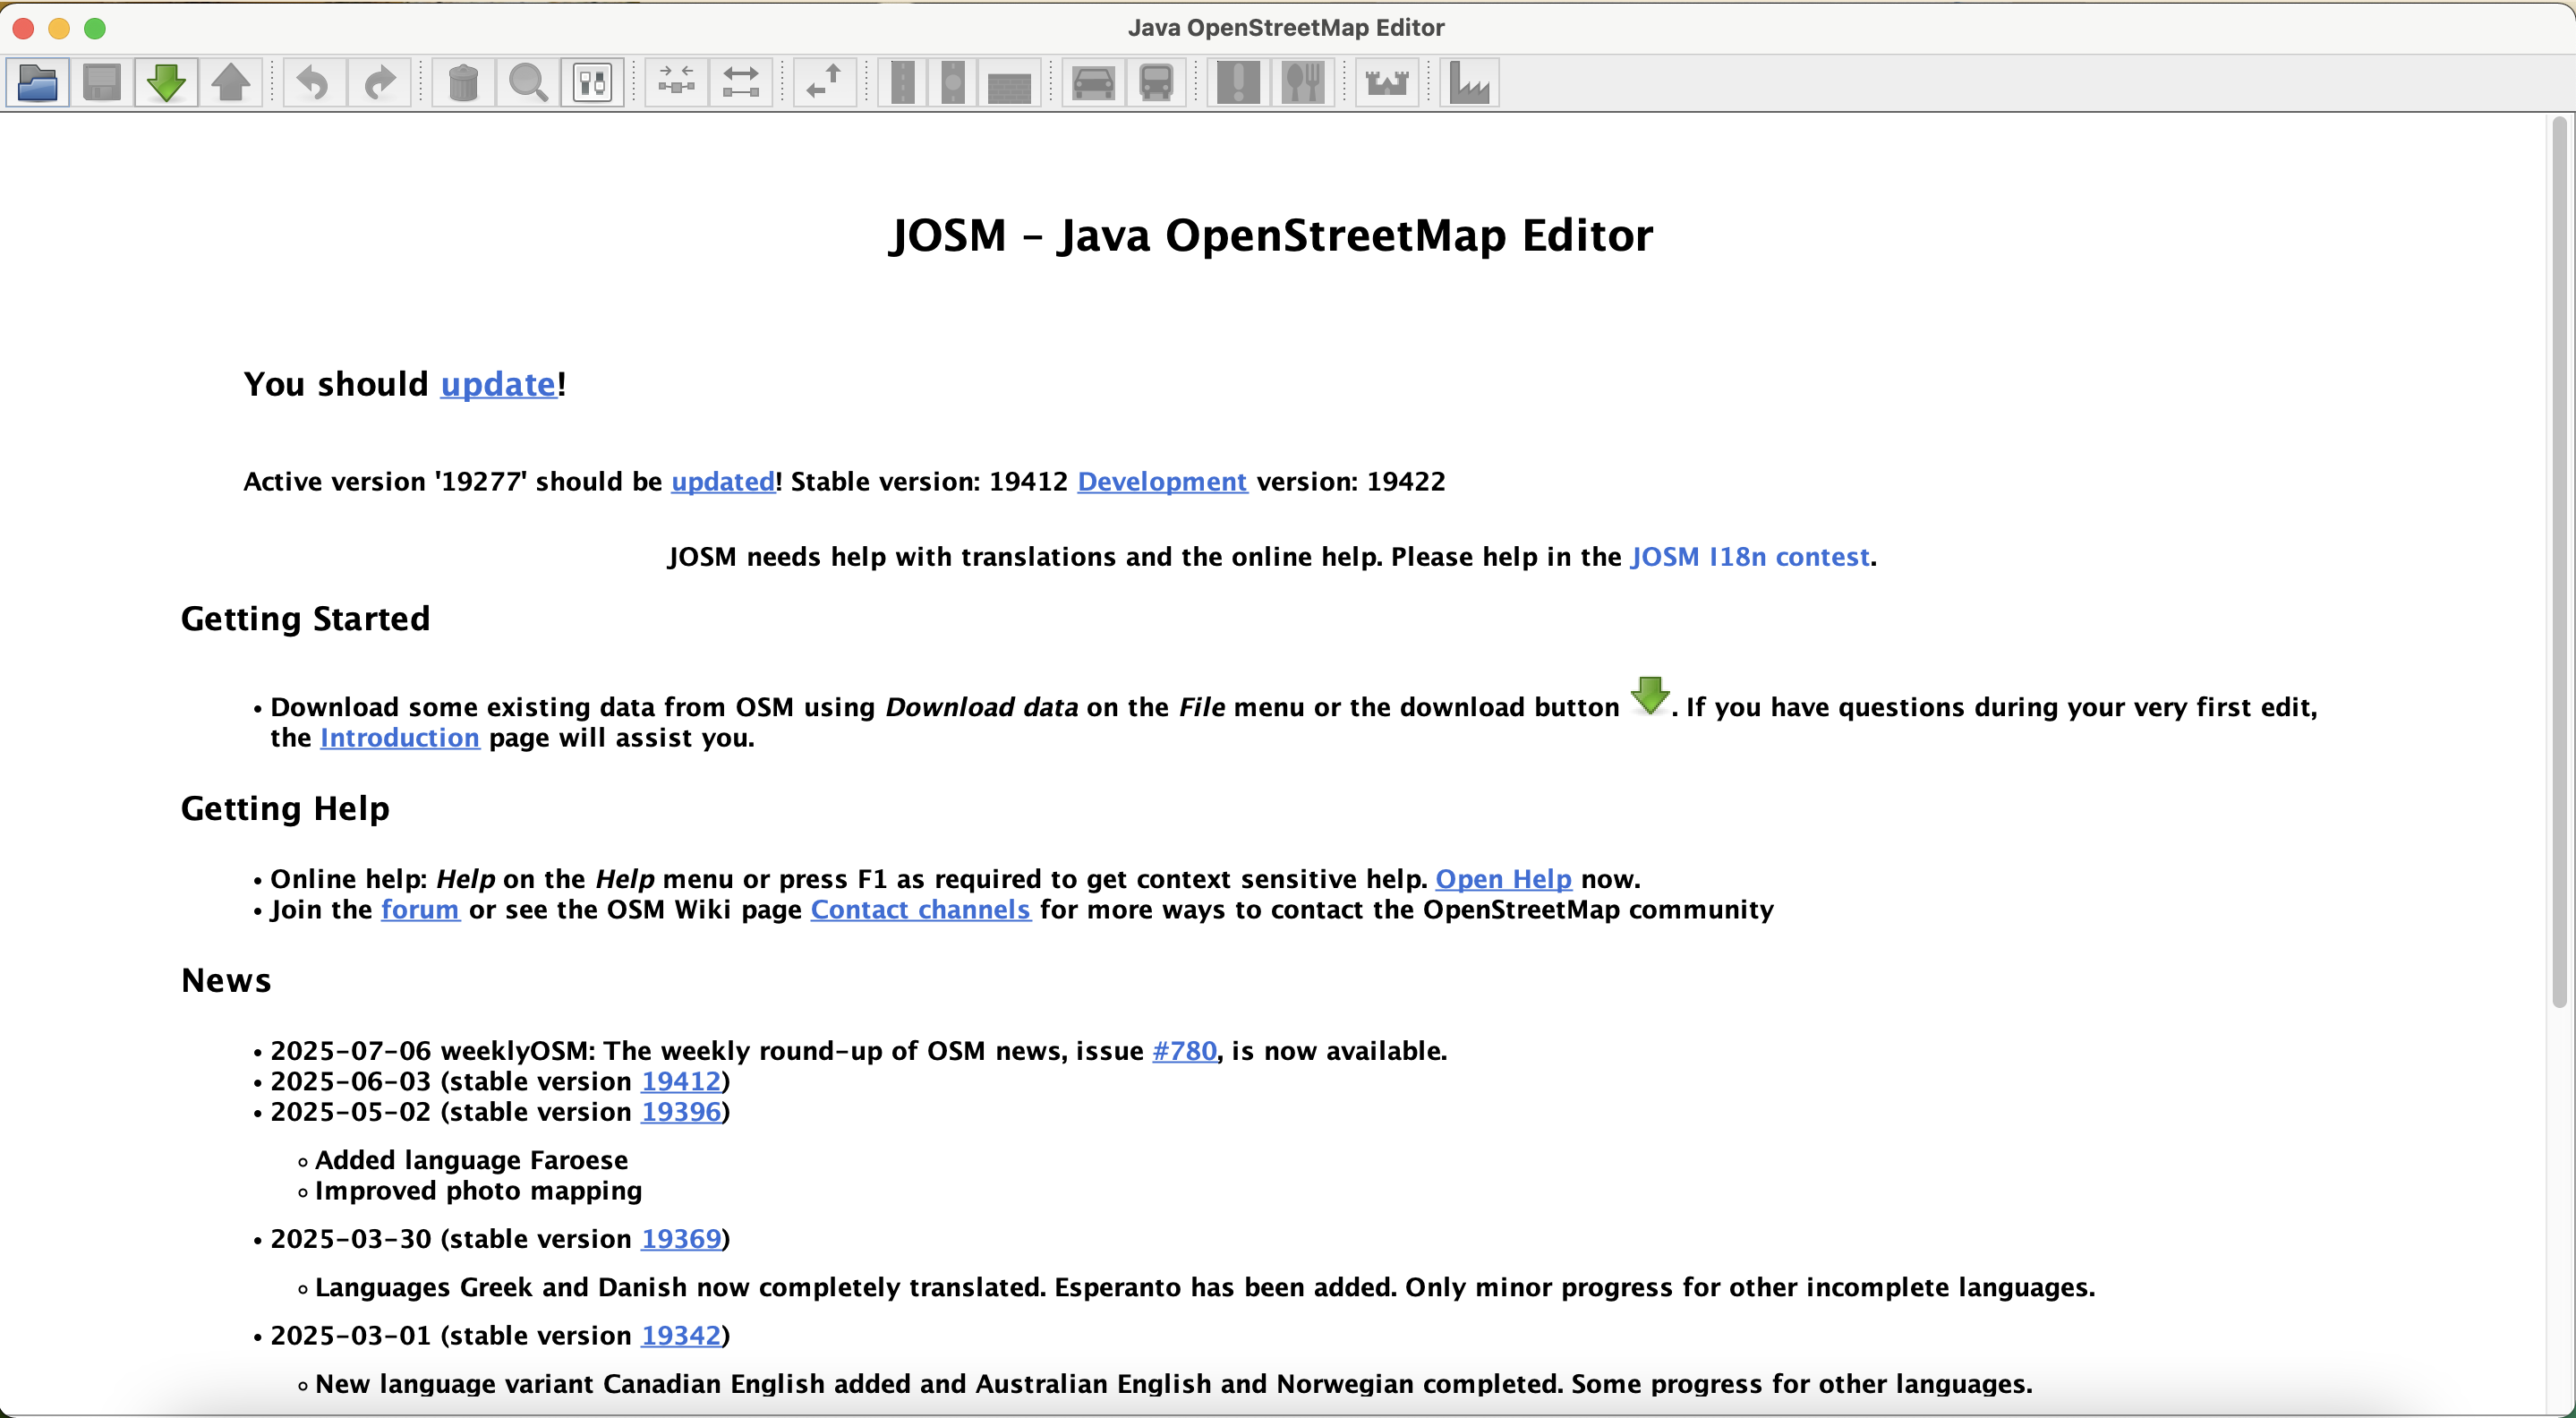
When JOSM is launched and loaded for the first time, you will be greeted by the JOSM start screen. The appearance may differ slightly depending on your operating system. Windows, macOS, and Linux each render the interface with minor visual differences, but the core layout and functionality are identical across all platforms.
Note
Depending on whether you have a PC, mac, or Linux operating system, the “look and feel” of JOSM will be slightly different, as will the location of some of the menus. Where possible, we will provide both Mac and PC screenshots to help you navigate the most popular options.
7.4.1.2. Accessing Your Preferences#
There are quite an array of menus and toolbars in JOSM, with many functions accessible in more than one location. Let’s take a walk-through to familiarize you with the most important ones⏤then we’ll start mapping.
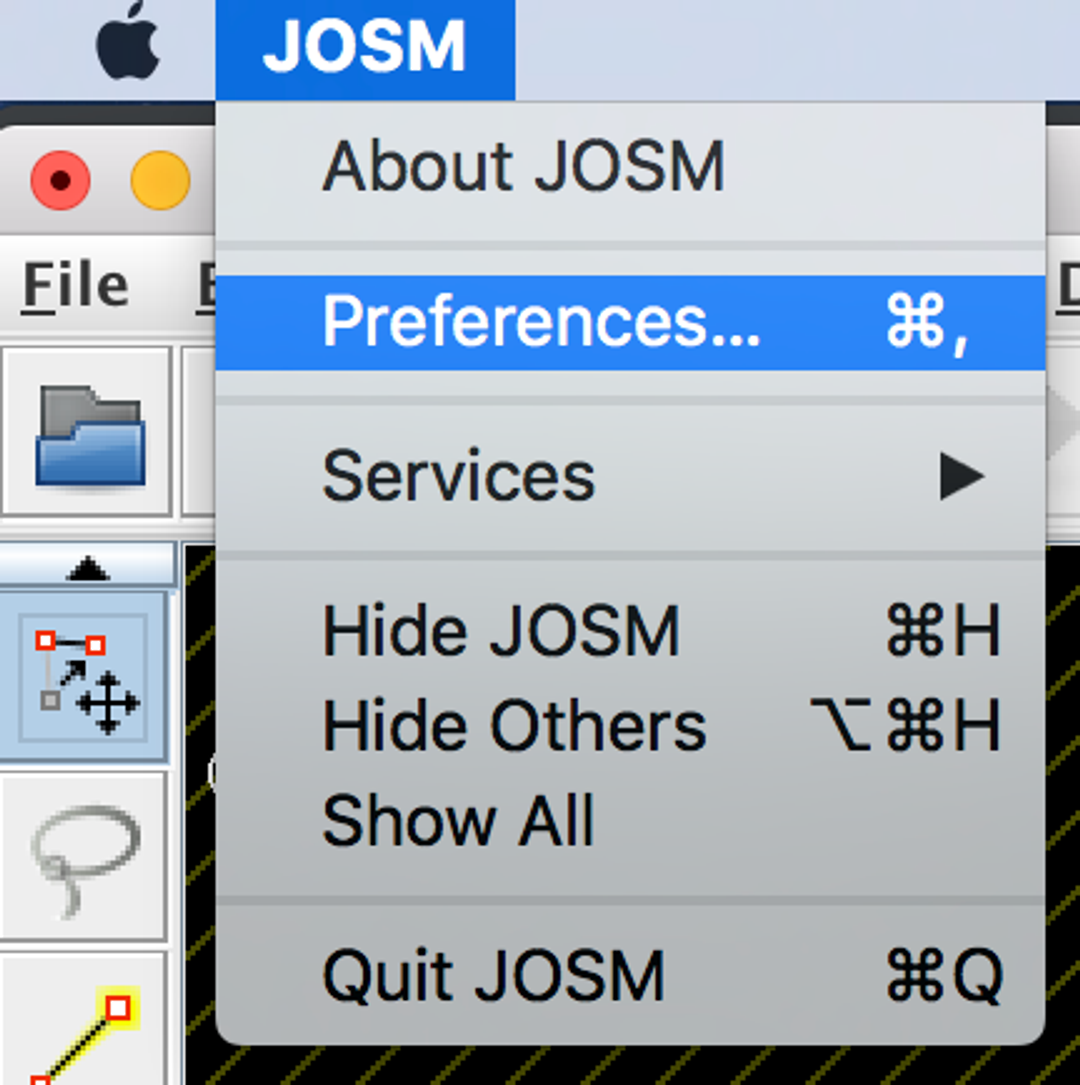
There are a number of key settings that need to be in place before you begin mapping, so let’s look at those first. These settings are found in the JOSM Preference menu. To access the Preferences menu:
PC: Go to Edit > Preferences
macOS: Go to JOSM (in the main mac toolbar) > Preferences(Refer to the image to the right if using a Mac.)
mac Visual
7.4.1.3. The Preferences Menu#
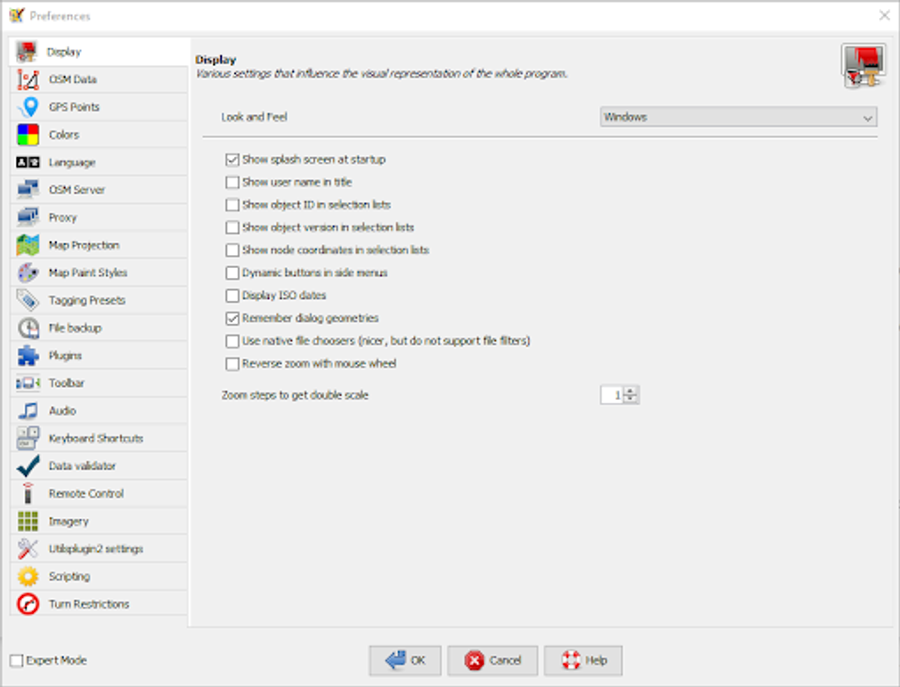
The multiple tabs to the left contain detailed settings for everything from display settings to default colors, default language, and data handling. We won’t go through each one in detail, just one or two key settings to get us up and mapping. But, on your own time, navigate through each to see the level of customization possible to create a very personalized editing experience within JOSM.
Note
You may have fewer tabs in your view. Additional tabs are associated with customization through plugins.
7.4.2. Connect to the OSM Server#
The most important setting to specify is your connection to the OSM server, along with your personal OSM credentials. This will ensure that any edits and subsequent uploads that you make to OSM data using JOSM will be attributed to your OSM account.
To start, click on the OSM Server tab in the Preferences dialog box (this is the sixth tab down on the left-hand side).
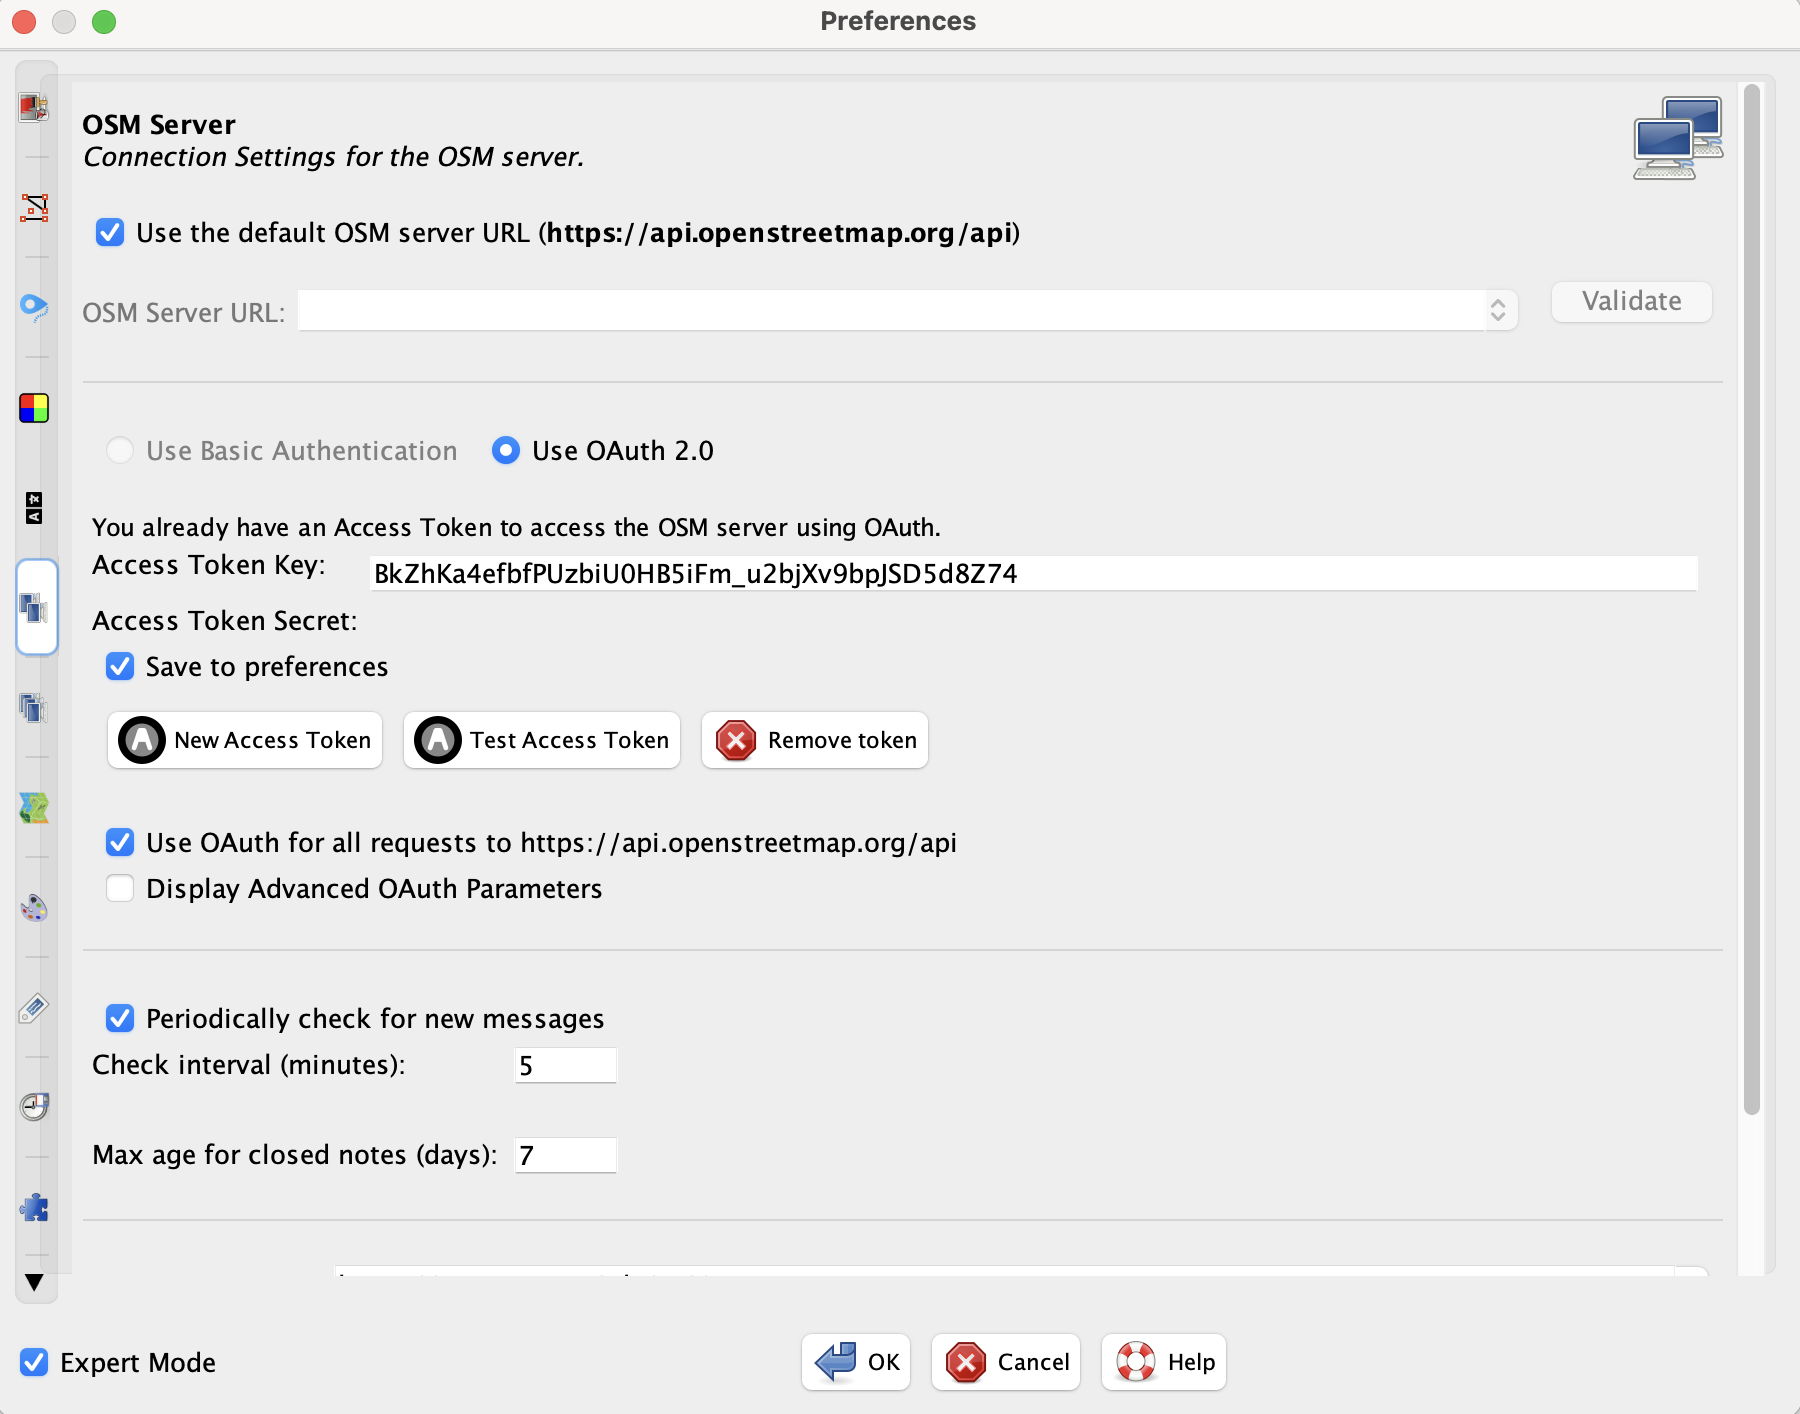
In this tab, you specify your account information so that any of the edits that you perform and re-upload to the OSM server will be attributed to you.
There are two ways to go about this:
The Basic Authentication route (just specify your OSM username and password)
The OAuth option (I would recommend this option if the JOSM installation is on your personal machine)
For now, let’s work with your OSM username and password, and, on your own time, you can set up a more permanent connection through OAuth.
7.4.3. Customize JOSM#
7.4.3.1. OAuth Steps#
If you choose to go with the OAuth option for account verification, you are granting JOSM the right to automatically upload map data on your behalf for all future download/upload requests. In order to facilitate this, you must receive an “access token” from the OpenStreetMap website. You initiate the process by entering your OSM username and password.
Enter your username and password into the dialog boxes
Click Authorize Now
You will receive notification that an OAuth Access token has been granted, which you must accept.
Click on Accept Access Token This token will be used in subsequent upload requests to access the OSM application user interface (API).
7.4.3.2. Plug-ins#

There are many plug-ins that you can add to the basic JOSM install to improve functionality and interactions with other platforms. Plug-ins are add-ons or extensions that enhance the capabilities of a software platform, without the need to alter the existing software install.
In JOSM we have many plug-ins to choose from, including one dedicated to drawing pre-tagged, geometrically accurate buildings, and another that allows us to work with Field Papers more efficiently.
We will look at plug-ins in more detail in the next module.
7.4.3.3. Remote Control#
The last setting we’re going to set up is remote control. This is a particularly important feature if you want your JOSM installation to work with certain websites, like the various OSM Tasking Managers. It will allow your JOSM instance to do things like download data with specific geographic extents, like the extent of a grid cell from the tasking manager.
Warning
Enabling Remote Control opens a local HTTP port on your machine, which means any application running locally can send instructions to JOSM. For this reason, only enable Remote Control if you intend to use JOSM with a Tasking Manager, and only on a machine you trust. Do not enable it on shared or public computers.
To enable Remote Control:
In the Preferences menu, click on the Remote Control tab
Check the box labelled Enable Remote Control
Leave the remaining settings at their defaults unless you have a specific reason to change them (choose the settings from the image below)
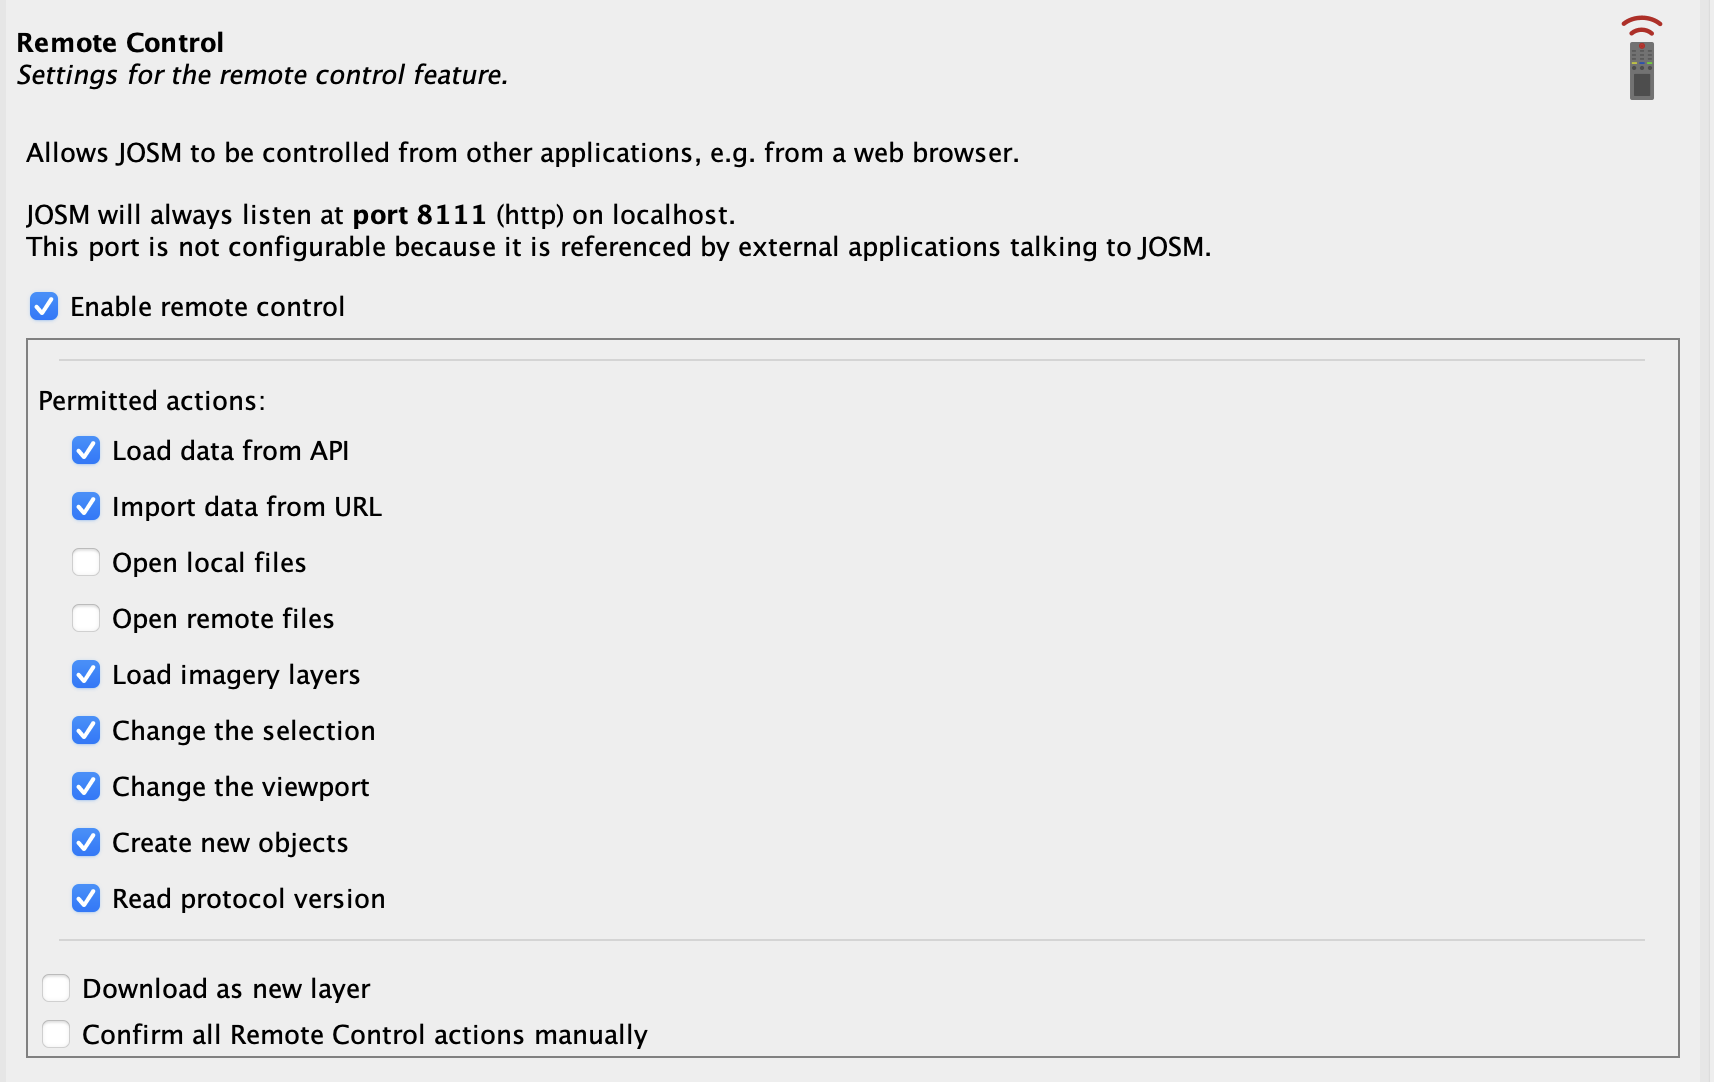
Click OK to save the changes to Preferences
Note
Depending on the changes you have made in Preferences, JOSM may prompt you to restart the application. If prompted, save any open work and restart.
7.5. Tour the Interface#
7.5.1. Map View#
Before we download or edit any live data, let’s tour the JOSM interface and practice drawing some simple features.
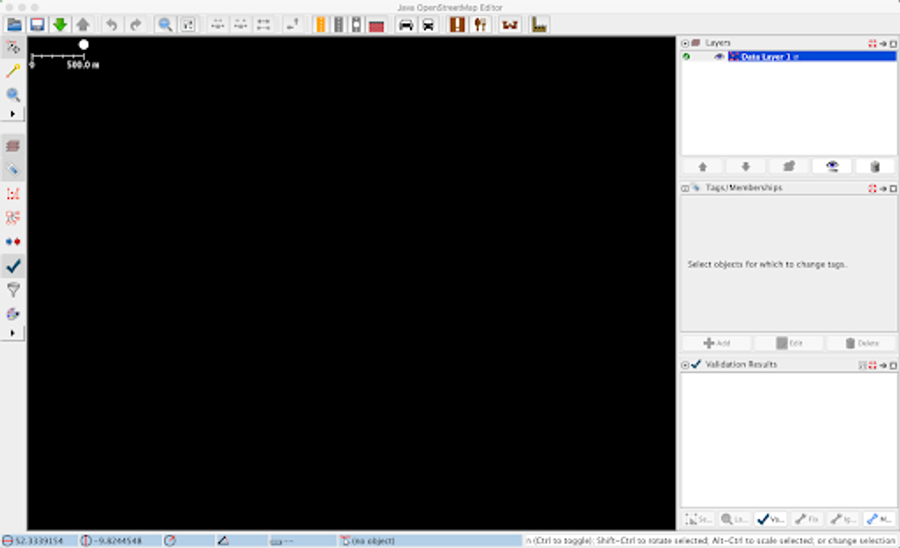
Go to File > New Layer. You will see the following screen: 7.08
MacOS View:
PC View:
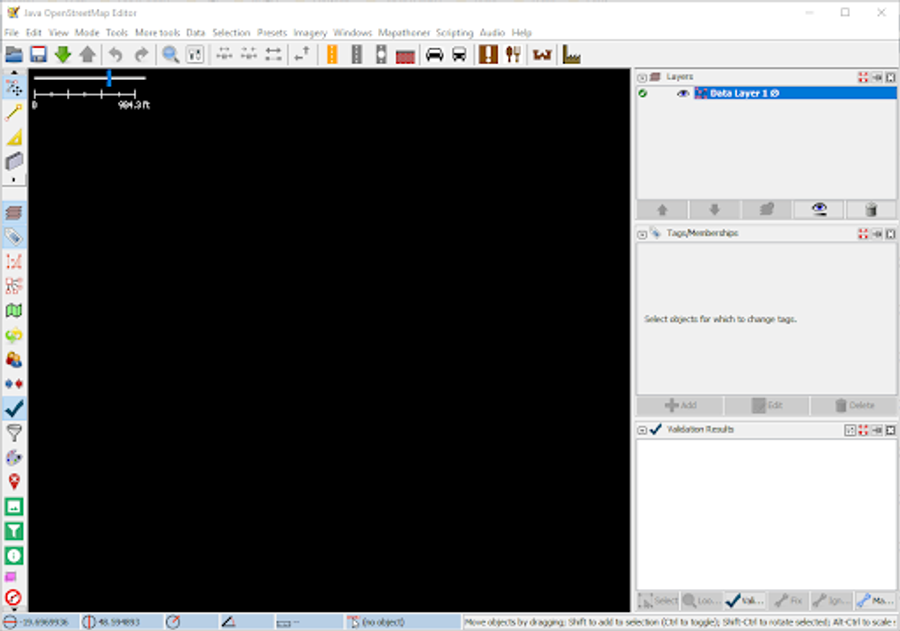
The main window or panel within the interface (the part which is currently black) is called the Map View. This is where the data is displayed and where the editing takes place.
Note
Your interface may look slightly different from the screenshots in this course, depending on your operating system and which plugins you have installed. The core layout, however, remains consistent.
7.5.2. Toolbars#
These are the main drawing tools:
Select (S) (top)
Draw Nodes (A) (bottom)
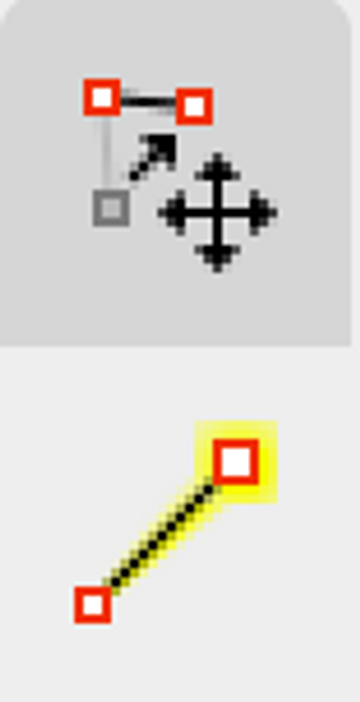
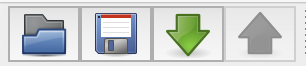
These are the tools to open, save, download, and upload your data:
These are the preset tagging tools, for popular road/street, transport, and facility tags:

Tip
All toolbars in JOSM are customizable. You can add, remove, and rearrange toolbar buttons via View > Toolbars. Your toolbar layout may differ from the screenshots in this course if you have made any customizations or installed additional plugins.
7.5.3. Information Panels#
The Information Panels to the right of the Map Frame show information about the data in JOSM, the different layers in the view, the imagery being used, how objects are tagged, and who the last mapper to edit a feature was.
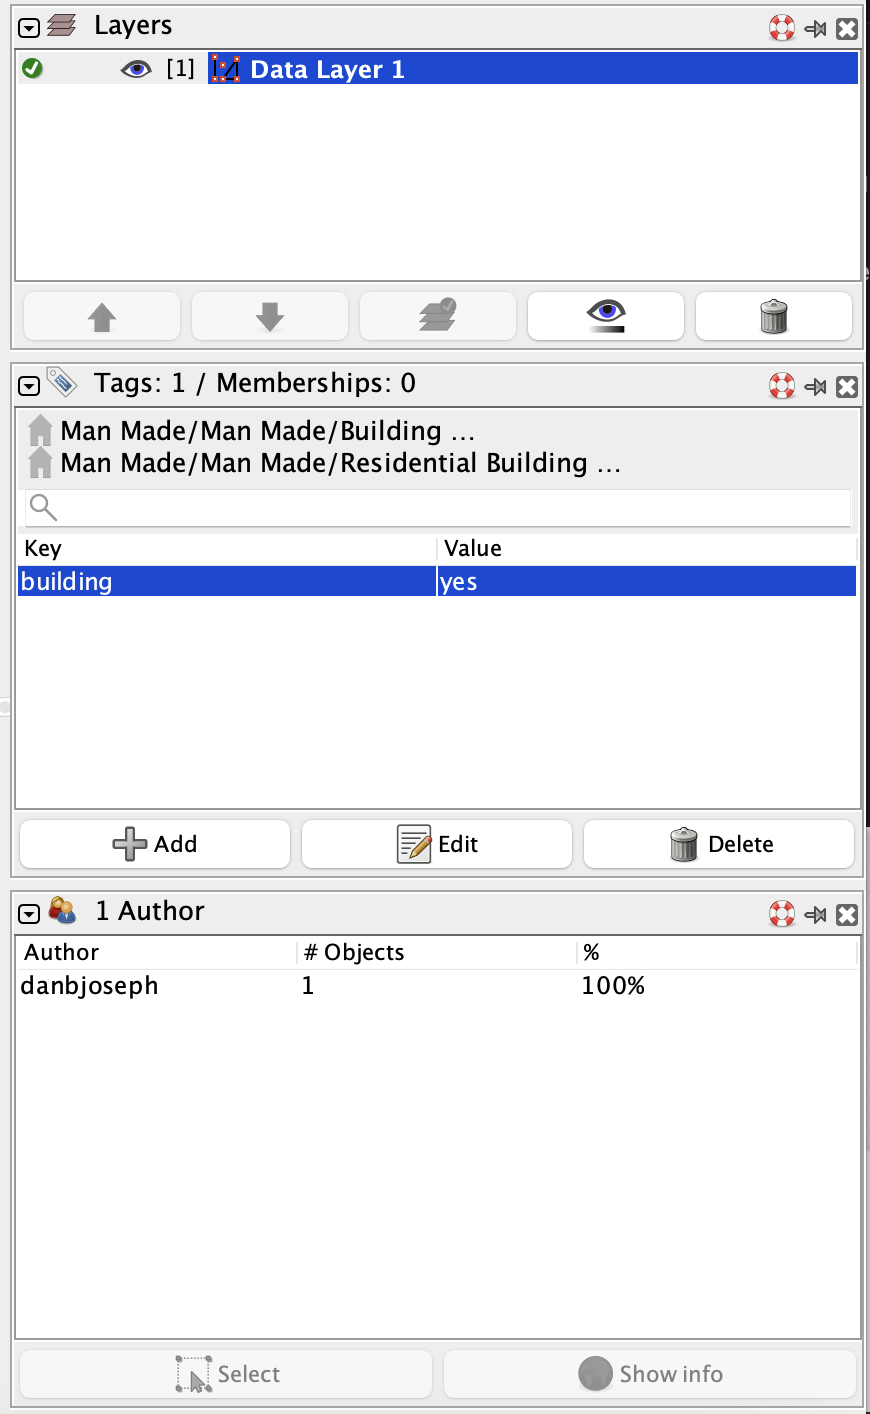
You can customize which panels you’d like to feature in this bar on the right-hand side of the map view. The options are available under the “Windows” drop-down menu at the top of the screen.
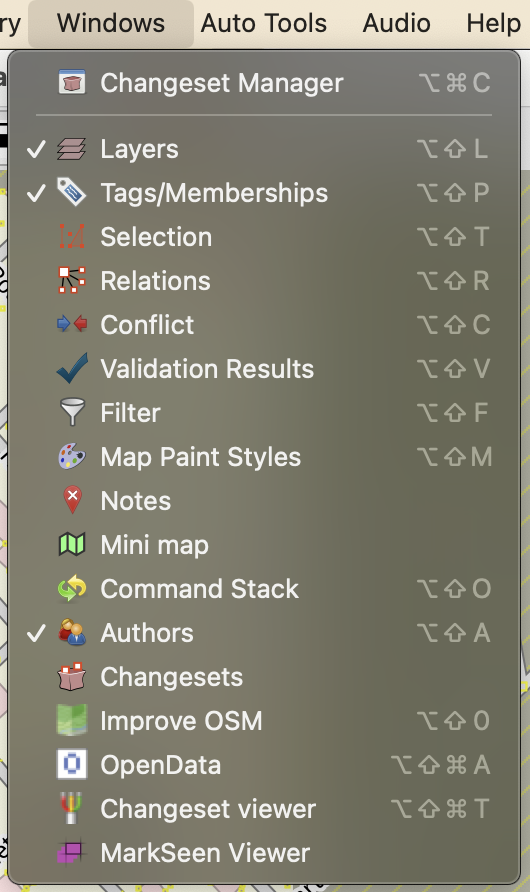
Note
The options you see in your Window menu will depend on the plugins you have installed on your machine.
7.5.4. Status Bar#
At the very bottom of the JOSM window, the Status Bar displays real-time information about your editing session:
Coordinates of your cursor’s current position on the map
Measurements for features, such as the length of a way, segment, or the area of a polygon as you draw
Tool hints which is a short description of what the currently active tool does
The Status Bar is particularly useful during precision editing, where you may need to verify the exact position or dimensions of a feature.

7.6. Drawing Features in JOSM#
7.6.1. JOSM: Drawing Basic Features#
7.6.1.1. Overview#
Remember, we first covered OSM data types in Course 2 when we learned how to draw our first features with iD editor, and also in Course 4, when we learned about the OSM data model.
Here is a quick reminder:
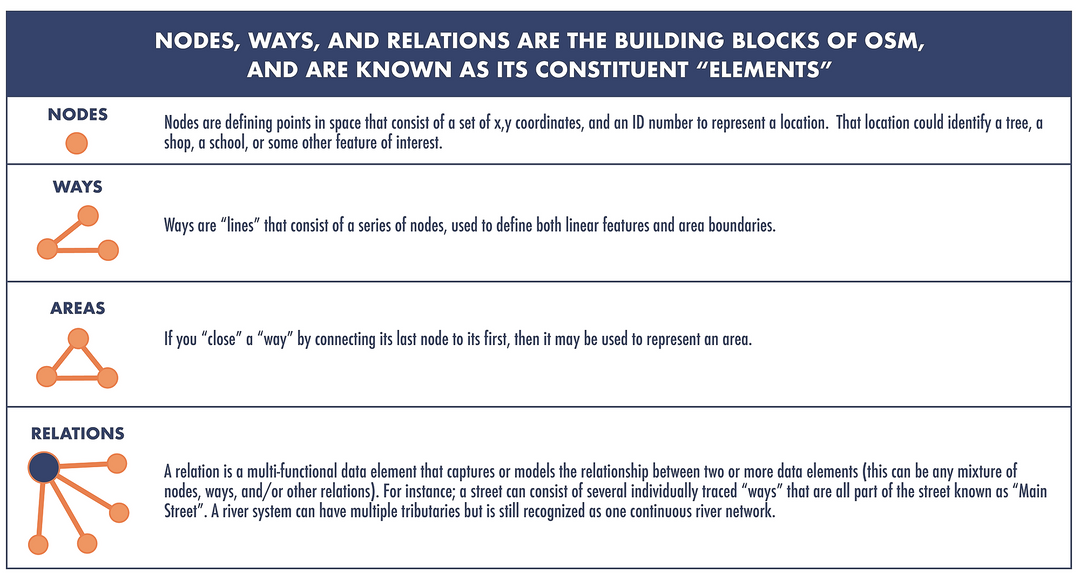
Tip
If you have not yet completed Course 4, we recommend doing so before proceeding. A solid understanding of the OSM data model will make the tagging sections of this course significantly easier to follow.
7.6.1.2. JOSM Basic Editing Tools#
JOSM’s three primary editing tools are accessed from the left-hand toolbar or via keyboard shortcuts. Learning these shortcuts early will meaningfully speed up your editing workflow.
i. Select Tool — Use the Select tool to click on and highlight existing features, view and edit their tags, and move them to a new position. A feature that is actively selected will appear highlighted in red. A feature that is not selected will appear grayed out. This color distinction is important as you can only tag or edit a feature that is actively selected (highlighted in red). Just click on the “Select” tool and use the left mouse button to select and/or move your object.
ℹ️ Keyboard shortcut: S for PC and macOS
ii. Draw Tool — Use the Draw tool to add new features to the map, such as standalone nodes, adding new nodes to create a new way, or extensions to existing ways. When the Draw tool is active, your cursor will display a small crosshairs icon as you move over the Map View.
ℹ️ Keyboard shortcut: A for PC and macOS
iii. Delete Tool — Delete is for deleting elements. To delete a feature, you simply select a feature (using the select tool) and then use the delete button on your keyboard (PC) or Fn+delete (macOS).
ℹ️ Keyboard shortcut: Delete (Windows) / Fn+Delete (macOS)
You can also enter Delete Mode, which allows you to delete features by clicking on them directly without having to select them first.
To enter Delete Mode, go to Mode > Delete from the top menu, which will add a Delete icon to your edit toolbar. Once Delete Mode is active, click on any node, way segment, or way to remove it.
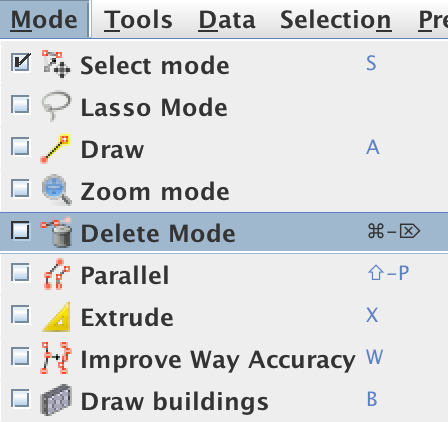
Warning
Be careful when using Delete Mode — it is easy to accidentally delete features you did not intend to. Exit Delete Mode by switching back to the Select tool (shortcut: S).
7.6.1.3. JOSM Basic Navigation#

Moving about can be a little different in JOSM than in other mapping software or platforms, but you’ll soon get the hang of it.
Action |
How to do it |
|---|---|
Pan/Drag the map |
Hold down the right mouse button and drag |
Zoom in/out |
Use your scroll wheel |
Zoom to a selected feature |
Press Ctrl+Shift+F |
Tip
YouthMappers Blogspot: A YouthMappers Introduction to Java OpenStreetMap (JOSM)
A YouthMappers Introduction to Java OpenStreetMap (JOSM) By Alysa Chen, Vassar College (USA)
Hear from Alysa as she talks us through learning JOSM as a non-technical student, and how it helped to increase her mapping productivity and efficiency.
7.6.1.4. Drawing a Node#
A standalone node represents a single point feature — a bench, a tree, a fire hydrant, or any point of interest. To draw a standalone node:
Click on the Draw/Add tool (keyboard shortcut: A). When you move your mouse over the Map View, you will see a little crosshairs icon.
Double-click quickly on the left mouse button to create a single node.
Warning
Common mistake: If you don’t double-click quickly enough, your draw tool may stay activated, and attempt to draw a line. If this happens, hit Escape on your keyboard, and your drawing will revert to a single node.
7.6.1.5. Drawing a Way#
A way represents a linear feature such as: a road, a footpath, a river, or any connected sequence of points. To draw a way:
Click on the Draw/Add tool (keyboard shortcut: A).
Click once on the map canvas to draw the first node of your way.
Click again on the map canvas and another node will appear, joined by the first segment of a way.
Keep clicking to continue to draw a way with several nodes and segments on it.
To finish the way, either double click, click on the Select tool (keyboard shortcut: S), or hit the Escape button on your keyboard.
7.6.1.6. Drawing an Area#
Drawing an area in JOSM is much the same as drawing a way⏤the only difference is that you have to close or complete the area by deliberately returning to the first node you drew and double-clicking. This is essentially “closing” the way. To draw an area:
Once again, click on the Draw/Add tool (keyboard shortcut: A).
Click once on the map canvas to draw the first node of your area.
Keep clicking to continue to draw an area with several additional nodes.
When you have defined the shape of your area, double-click once more on the starting node to complete it.
Note
You might have to check to make sure that you are “snapping” to the right node before you commit to your last double-click.
7.6.1.7. Tagging#
We learned about tagging in both courses 2 and 4, but as a quick refresher:

In order to tag something in JOSM, you must first select the feature you want to tag.
As a rule of thumb, if a feature is grayed out, then it is not selected. If it is highlighted in red, then it is actively selected and ready for re-editing (and/or tagging).
Click the Select tool
Using the left mouse button, select the feature you wish to tag
Go to the Tagging menu in the Information Panel, and click Add
In this instance, I want to tag the selected area as a simple building. So, in the Key drop-down menu, I select “building”. Note: You can either scroll to this alphabetically or start to type it and the menu will navigate to it.
In the Value drop-down menu, choose Yes
Click OK
You will notice that the new building now has a light pink fill. The building tag has already helped to define the symbology for this feature.
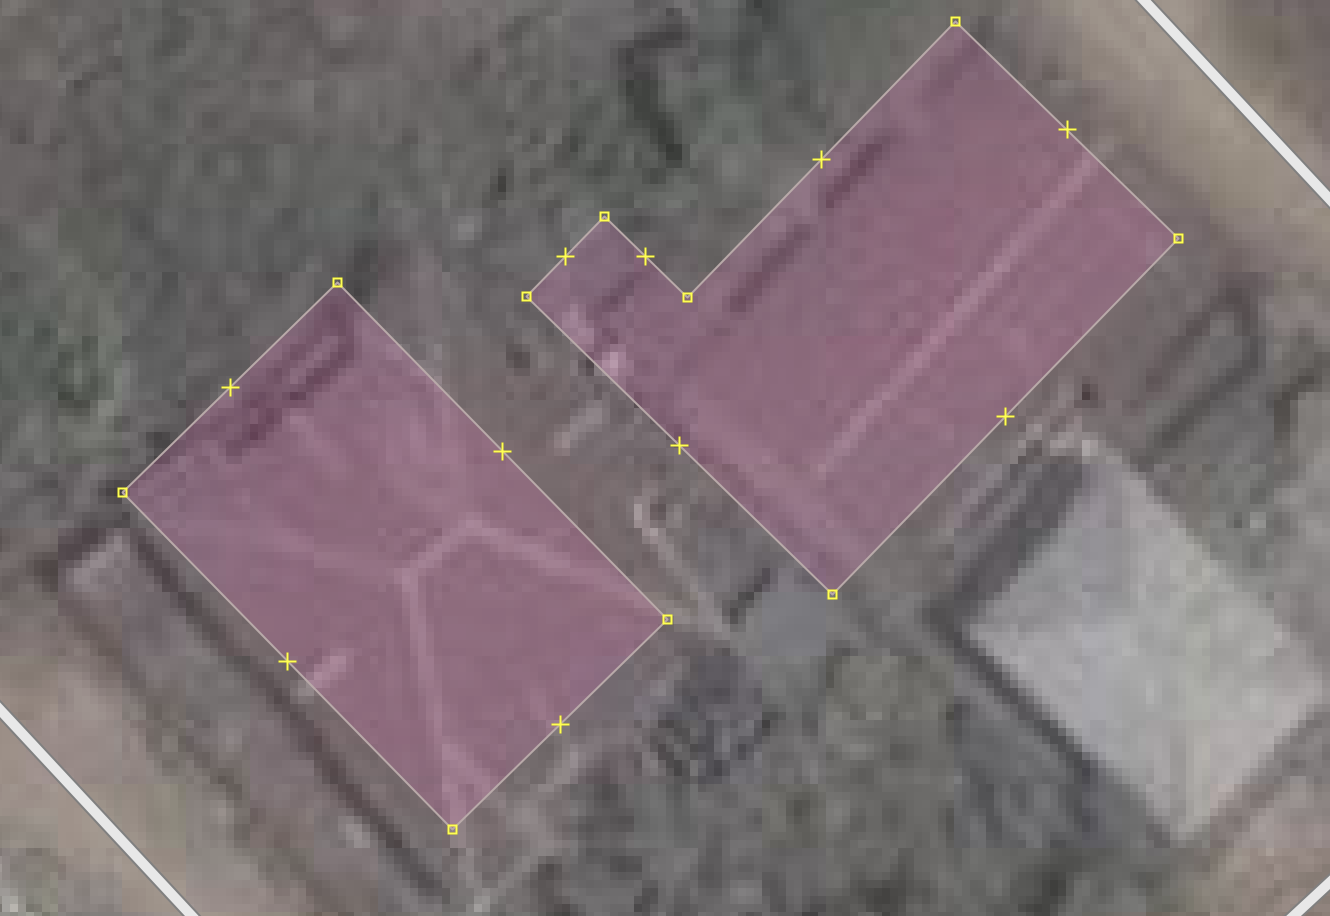
If you wish to tag several features with the same tag simultaneously, you can select multiple features using the Select tool, then using the Add button from the Tagging panel.
Another nice feature of the JOSM tagging tool is that it remembers the last tagging pair used. You will notice in the last .gif that the tagging pair of building + yes was already populated. In fact, the tagging feature recalls the last five tagging pairs used. This is particularly handy when you are working with several recurring map features within a given area.
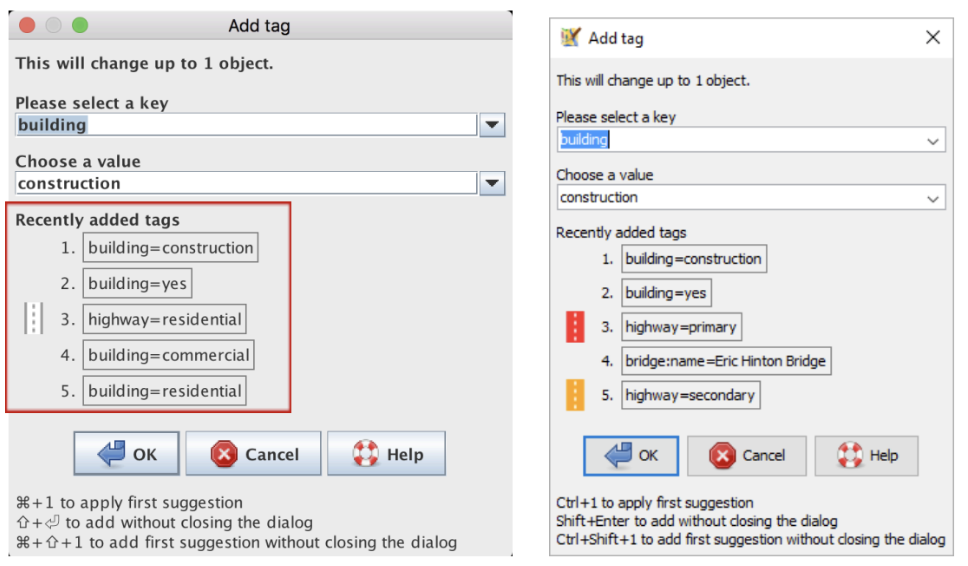 Add Tag Dialog Box: PC and MacOSM View
You will have to develop a certain familiarity with the OSM data model in order to get comfortable with and make full use of the tagging system within JOSM. It would be a good idea to revisit the Map Features page on the OSM Wiki to get a refresher on some of the most commonly used tags. This is an incredibly detailed resource, and there is always something new to learn.
Click here to navigate to the Map Features OSM main page.
7.6.1.8. Preset Tagging via the Presets Menu#
JOSM’s Presets menu offers a structured, hierarchical collection of tag templates for common feature types. Instead of entering tag keys and values manually, you select a feature type from the menu (see the image below) and JOSM presents a detailed tagging form with all relevant fields pre-organized for you.
There are two ways to access presets:
Via the Presets drop-down menu at the top of the screen (comprehensive, organized neatly by thematic categories)
Via the Preset toolbar (quick access to the most frequently used presets)
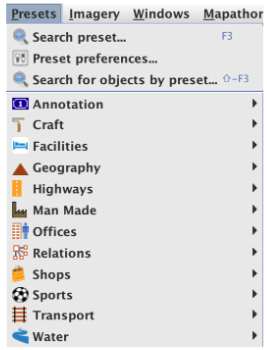
7.6.1.8.1. Tagging a (Fictional) Restaurant#
Let’s take a look at the process of tagging a (fictional) restaurant.
Draw a node in the map view
Note: Remember, we need a feature to attach the tag to, and that feature needs to be highlighted/active for us to tag it.
Click on Presets > Facilities > Food + Drinks > Restaurant
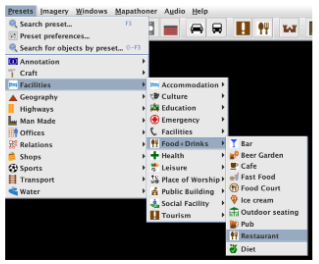
You will be presented with the following detailed tagging interface:
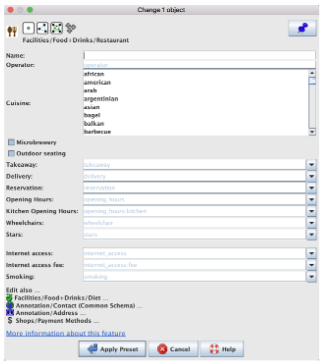
This is an incredibly detailed list of potential tags for this one feature (a restaurant), many of which would be impossible to populate unless you had personal knowledge of the premises or if you had conducted fieldwork to facilitate the tagging process. It is important to know that you DO NOT have to populate all of these boxes/drop-downs. They are merely a guide to help you consider all the possible tagging options for a premise (like a restaurant) and a very useful and structured way of exploring the OSM data model for when you are deciding on your own field-work data model/questionnaire. Keep this in mind for our later modules on field work and survey design!
Let’s assume that all we know about our fictitious restaurant is that it is called the “Daisy Cafe” and that the cuisine type is “coffee_shop”.
Populate both of these options, and click on “Apply Preset”
You will notice that the tag information in the Layers menu on the right has populated with the new information and that our feature now has three tags associated with it:
amenity=restaurant
name=Daisy Cafe
cuisine=coffee_shop
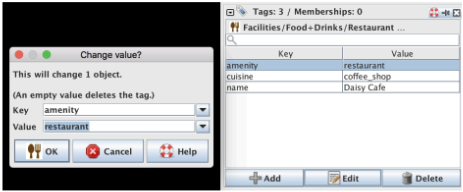
You may edit any of these individual tags at any time by clicking on the Edit option, though this will only let you edit each of the three individual tags associated with the restaurant one at a time. If you want to return to the more comprehensive menu of tags, you will need to highlight your restaurant feature and return to the preset menu.
The tagging toolbar presents a slightly more restricted selection of tag choices but does feature several of the more frequently used tags. The detailed tagging interface you will encounter is exactly the same as that found under the Preset drop-down, so it’s really just personal preference as to which of these handy tagging tools you may use. You will not need any of the features that you have created or tagged up to this point, so there is no need to save your work unless you want to.
Tip
The Presets menu is an excellent way to explore the OSM data model. Browsing through its categories gives you a sense of the full range of features that OSM can represent, which is particularly useful when designing a field data collection survey.
7.6.2. Shortcuts in JOSM#
One of my favorite aspects of working in JOSM is the many keyboard shortcuts you can use to streamline your mapping workflow. Instead of having to locate a specific tool from a toolbar (or buried several levels deep in an editing menu), you can activate that same tool using a single keyboard shortcut. This may not seem like a timesaver right now (especially when you will have to learn what shortcut goes with what tool), but when you become familiar with them you will see a noticeable difference in the speed and efficiency with which you map!
Once again, these shortcuts might vary depending on your operating system, but they are mostly consistent. See here: https://josm.openstreetmap.de/wiki/Shortcuts
There is also this handy visual, one that I have printed out and have hanging over my desk!
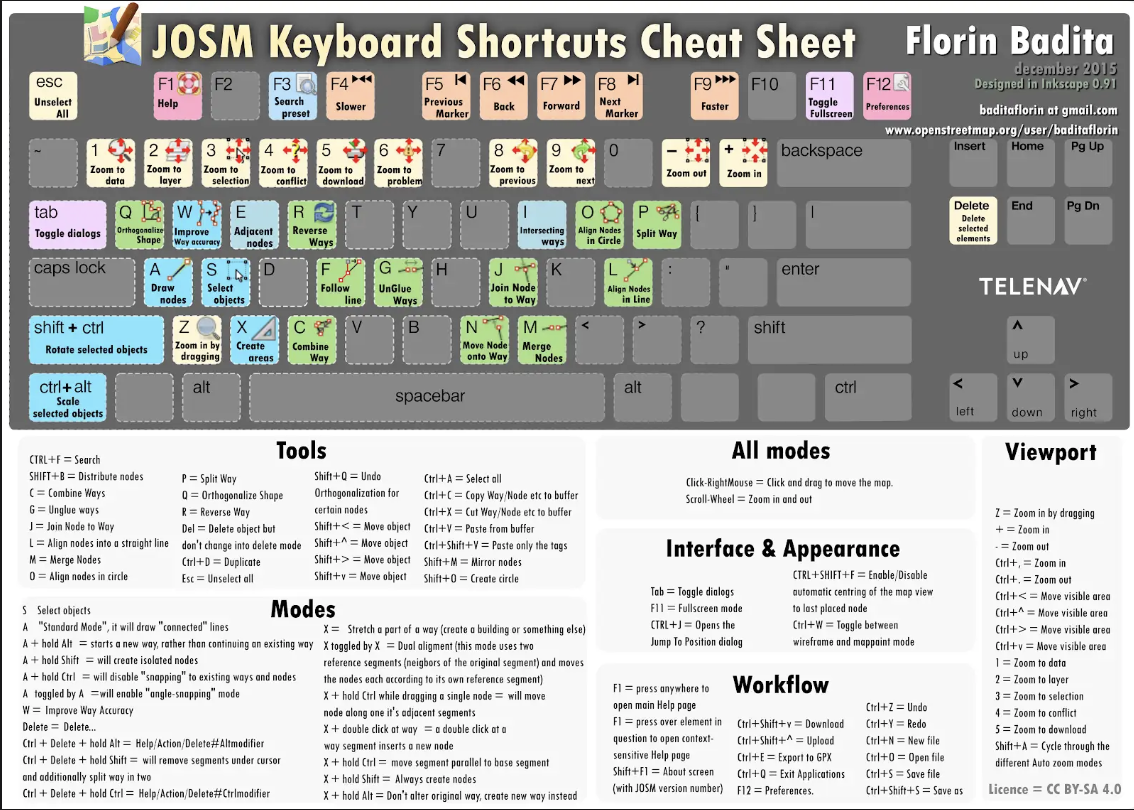 Image Source: JOSM Keyboard Shortcuts, Wikimedia Commons
7.7. Working with Real OSM Data in JOSM#
7.7.1. Adding and Downloading OSM Data#
7.7.1.1. Overview#
One of the main benefits of working with JOSM is that you create and update data offline, so data usage is limited. This is particularly handy when working with low or inconsistent bandwidth. There are several different ways to download data locally to JOSM.
To explore these, go to File > Download data or click on the Download data button (green downward arrow)

In the Download from OSM dialog box, you will see five tabs that indicate the five different ways you can download data for editing
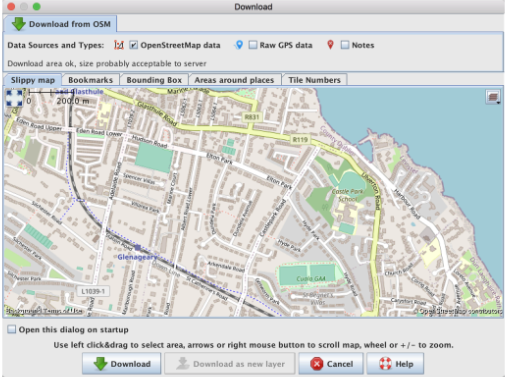
Different ways you can download data for editing:
Slippy Map: Using your mouse, or the +/- buttons on your keyboard, pan and zoom around the map to find the area you would like to edit. When you’ve identified it, simply draw a box around the extent you wish to download and click on the Download button.
Bookmarks: In this tab, you can save the coordinates of geographic extents that you visit/edit on a regular basis. This is particularly useful if you are working on a recurring project, or, you like to keep an eye on the changes in your local neighborhood.
Bounding Box: If you know the bounding coordinates of the area that you would like to download, then you can either enter them here manually, or (and this is how most mappers use this tab) you can visit www.openstreetmap.org, search for the area you wish to map, copy/paste the URL into the text box in the Bounding Box tab, and click on the Download button.
Areas Around Places: In this tab, you can do a regular word search of OSM to find place names or features that are near a particular place.
Tile Numbers: In this tab, you can specify a specific tile address to locate and download.
My favorite way to locate the area I wish to map is to find it on www.openstreetmap.org, copy the url, and then use the Bounding Box tab to jump immediately to that area. Take a look here:
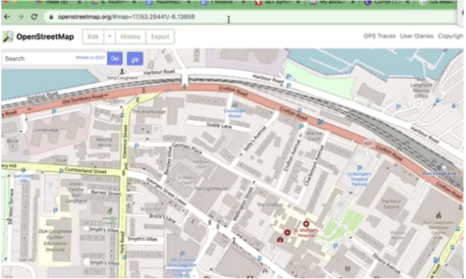
What I also like about this option is that you can check the area you wish to download BEFORE you click on that Download button, by hopping back to the Slippy Map tab after you’ve pasted the URL from www.openstreetmap.com.
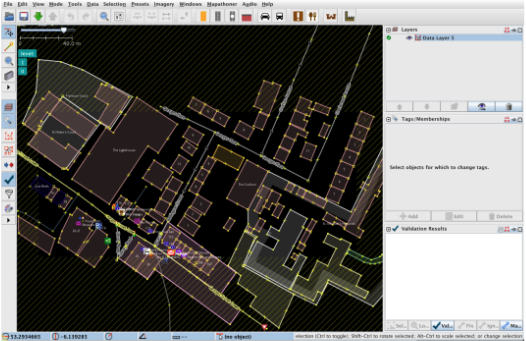
The editing interface and the appearance of the downloaded OSM data are quite different to what we are used to in iD editor.
Click on any of the existing features to see how the attributes are displayed in the Tags/Memberships window:
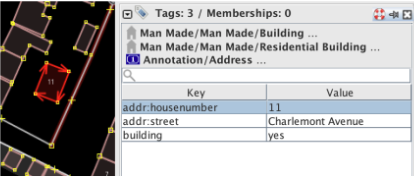
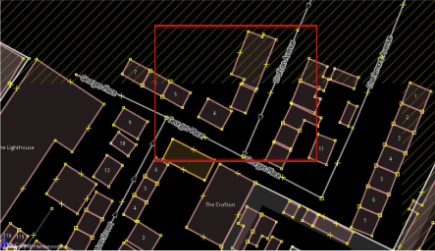
Notice that the bounding box that you specified in the Download dialog is indicated by a clear black background. JOSM downloads all data that intersects with the bounding box that you specify, hence the additional data trailing beyond this bounding box.
If your bounding box is set by a tasking service such as the HOT Tasking Manager, or the TeachOSM Tasking Manager, you should only edit the data that falls within the black box, and refrain from editing any features that fall within the striped/crosshatched area, as those features fall within the task area of another mapper.
7.7.1.2. Adding Imagery to the Editing Window#
Unless you are working with a Tasking Manager, such as the HOT Tasking Manager, or the TeachOSM Tasking Manager, imagery does not automatically appear behind your downloaded data.
To add imagery to the window, go to the Imagery drop-down menu at the top of the screen. Notice you have many of the same imagery options that you are familiar with in iD.
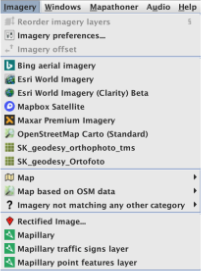
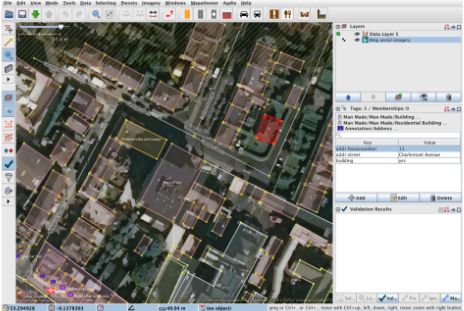
I’m choosing Bing imagery for my editing session as I have edited in this area before and I know that it has the best resolution and is the most current.
Warning
Imagery offset: Not all imagery sources are perfectly aligned with GPS ground truth. When an imagery layer is slightly misaligned relative to the actual position of features on the ground, this is called an imagery offset. Mapping from offset imagery introduces positional errors into OSM. Before you begin tracing, always check your imagery against any existing GPS traces or well-mapped features in the area to identify potential offset. If an offset is present, it can be corrected in JOSM via Imagery > New offset. When in doubt, cross-reference two or more imagery sources to identify the most reliable one for your area.
You can add several different imagery sources to your JOSM editing session, and you can switch between them quickly and easily to assist your editing decisions. You can turn the imagery layer on and off and also adjust the opacity, contrast, and sharpness of the image.
7.7.1.3. Managing and Deleting Data Layers in JOSM#
If your initial data download was for a particularly busy or previously well-mapped area, then you may want to consider removing that layer and re-downloading a smaller, more manageable area to map.
To delete the first layer that you created, click on the little waste bin icon in the bottom right-hand corner of the layers window, or simply turn it off by clicking on the little eye icon beside the layer name.
You can then add an additional data layer to the map window by downloading a new geographic extent.
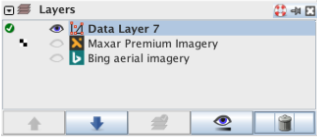
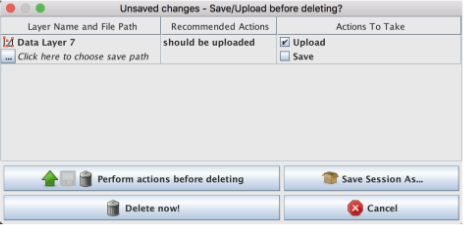
If you have not made any changes to a layer that you have downloaded, deleting it simply removes the downloaded layer from your device⏤it doesn’t delete it from OSM (remember, it’s just a localized copy). If you have made any changes to the layer since you’ve downloaded it, JOSM will always give you a warning to check if you really wish to delete the layer or to review and upload your edits.
7.7.2. Editing and Uploading OSM Data#
7.7.2.1. Overview#
Now that you’ve downloaded some real OSM data, let’s revisit the editing process in JOSM and walk through the process of saving and re-uploading to OSM.
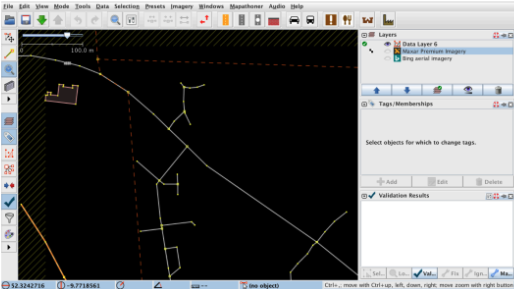
This is a download of a much simpler area, one that has new development (and recently updated imagery). I’m going to trace several new houses and upload them to OSM. Simply follow along for now. Then, you can replicate the steps in an area of your own choosing.
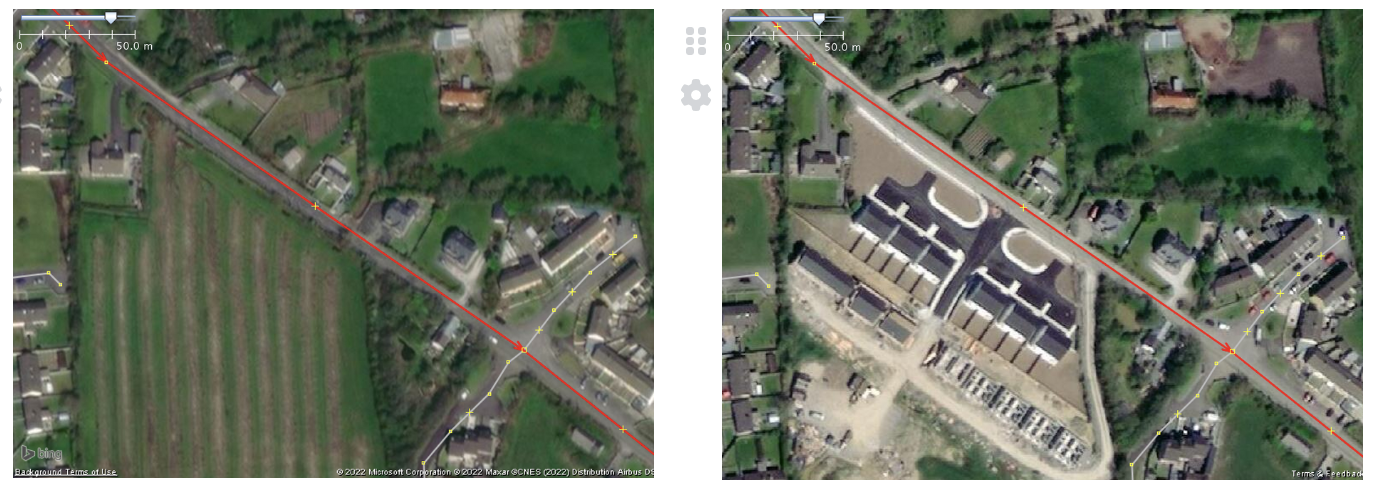
Note that it is important to check several imagery sources before you begin mapping, both to identify the most current imagery and for any potential offset issues.
These side by side images show the same area (with main road highlighted for reference), and you will see that the new construction is missing from the image on the left (Bing imagery).
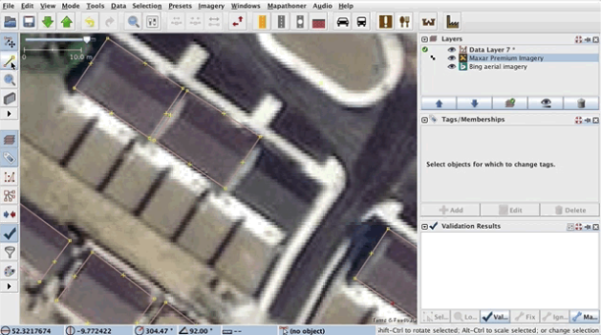
7.7.2.2. Drawing a Building#
Remember, to add a new feature, click on the Draw/Add tool (you will see a little crosshairs icon as you move over the map window)
Click once on the map canvas to draw the first node of your building
Keep clicking to continue to draw your building, using several additional nodes (depending on the shape of the structure)
When you have defined the shape of your building, double-click once more on the starting node to complete it. (Again, you might have to check to make sure that you are “snapping” to the right node before you commit to your last double-click.)
To square your building, make sure that the building is still highlighted, then click the “Q” key on your keyboard. (“Q” stands for orthogonalize, which is a little obscure, but remember the shortcut “S” has already been taken for “Select”.)
To tag your building, click on the Edit button in the Tags/Membership window, and select “Building” and “Yes”
Tip
Why orthogonalize? Real buildings almost always have right-angle corners. Without the Q shortcut, a hand-drawn building footprint will have slightly irregular angles at each corner. Orthogonalizing corrects this automatically — it is a small step that makes a significant difference to data quality.
7.7.2.3. Saving and Uploading Data to OSM#
If you have a reliable connection, it’s good practice to save regularly. (Remember, this was a practice we spoke about when mapping with iD editor. It’s the best way to prevent conflicts if there are other active mappers in your area.)
Go to File > Upload Data or simply click on the Upload Data button (green up arrow)
You will see the following interface:
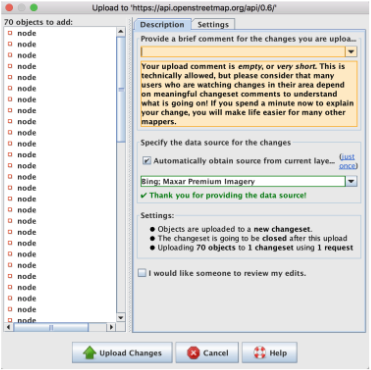
Add a changeset comment (remember this from iD, it’s a brief description of the work that you have completed in this editing session)
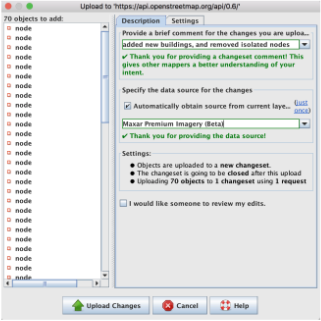
When you are happy with your changeset comment, click Upload Changes
If there aren’t any errors with your drawings or tags, then your data will upload successfully and you will receive verification from JOSM
Tip
YouthMappers Blogspot: Tech Tips for Better Mapping
Tech Tips for Better Mapping By Leigh Seitz, College of William & Mary (USA)
Hear from Leigh as she shares her experiences in switching from iD Editor to JOSM during her time as an intern at the USAID Geocenter.
7.7.3. Dealing with Errors During Upload#
7.7.3.1. Overview#
We will look at the Validation workflow in more detail in the next course, but every new mapper has to learn to deal with errors and fixes to the data they create in order to successfully upload their edits to OSM.
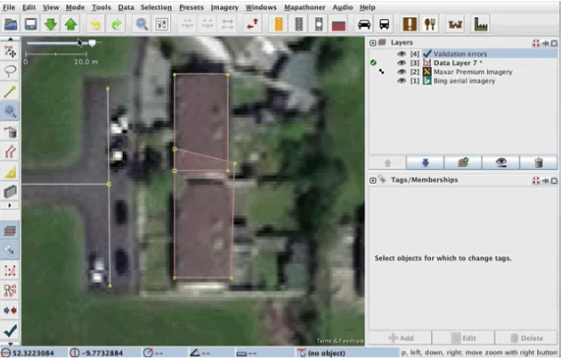
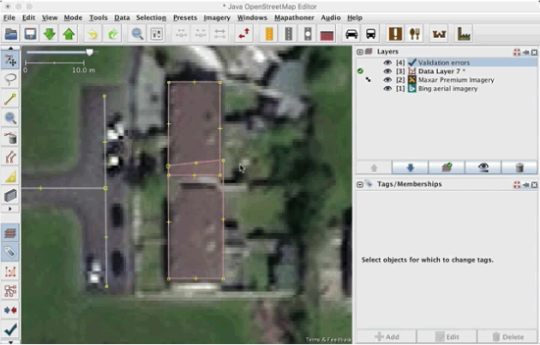
In the image above you can see an attempt to upload two (deliberately incorrect) buildings to OSM. JOSM picks up on the incorrect geometry, the fact that the buildings are overlapping, and that one or more of their nodes are connected or “glued”.
Once the JOSM uploader detects the errors, it automatically adds the “Validation Results” window to the right-hand panel. Using this panel, you can navigate/zoom directly to the offending geometry to fix it, which is particularly useful when you have a lot of data. We will look at this panel in more detail in the next course.
7.7.3.2. Fixing Overlapping Buildings#
In the previous example, we had two overlapping buildings rejected for upload. Let’s fix them quickly, and push the corrected geometries to OSM. Again, this is an illustrative example, just follow along.
First, zoom in on the features you wish to fix so that you can clearly see the error and any nodes that need to be selected and moved.
Select your nodes one by one, and place them in the correct position.
Depending on the drawing tool/method used, you may encounter nodes that are joined or “glued” together and when you attempt to reposition them, the walls of both buildings start to move with you.
Select the joined/glued node.
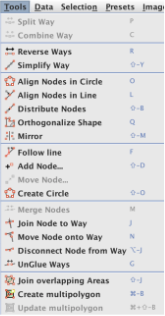
Go to Tools > Unglue Ways (keyboard shortcut: G).
You will see that the two nodes are now separated. You can move them independently of one another to more appropriate locations.
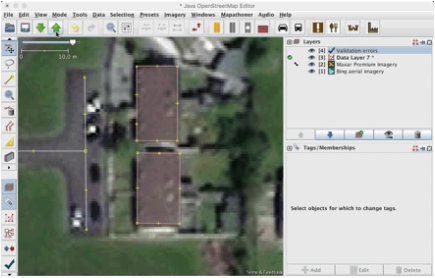
Always make sure to select and square and buildings that you have edited (using the “Q” button on your keyboard).
You will notice that there are many different geometry editing options available under the Tools menu. We won’t go through each of the options one by one, but you should explore these on your own time to become familiar with their function. You will probably recognize quite a few from your time editing in iD editor.
When you are happy with your building edits, you can attempt to re-upload the data to OSM. This time, you should have no issues with the upload process.
7.8. Dig Deeper#
7.8.1. Want to Dig a Little Deeper?#
LearnOSM: Getting Started with JOSM
LearnOSM is an online resource with step-by-step instructions (in multiple languages) on the many tools and platforms that can be used to generate or add data to OpenStreetMap. It features a section on iDEditor, JOSM, and editing using smartphones.
OSM Wiki: JOSM Homepage
This includes detailed installation instructions and a user guide.
OSM Wiki: JOSM Shortcuts Cheat Sheet
This is an excellent visual to help you remember the many keyboard shortcuts to expedite your editing in JOSM.
There are also many excellent video resources on YouTube about how to map in OSM, created by the growing OSM community. Here are some of our favorites:
HOT Channel: How to Map Buildings in JOSM
HOT Community Webinar Recording: Introduction to JOSM

7.9. Assignment#
7.9.1. JOSM 1: Introduction to Mapping With JOSM Assignment#
For the following assignment, you will demonstrate your ability to use basic mapping functions in JOSM. You will be asked to add tagged buildings, roads, and points of interest to the .osm file provided. You will not upload this data to OSM. You will resave the edits you have made and submit the file to the YouthMappers team for review and grading.
7.9.2. Instructions#
Download the following file: JOSM_YM_Demo.osm
Launch JOSM, and open the file
Go to the Imagery drop-down, and turn on the Bing imagery source (there is one building contained in this demo file, and it is sufficient to navigate you to the correct location on the imagery)
Trace and tag the following features: a. Four simple buildings (tagged with building = yes) b. Three examples of Road tracing (tagged with suitable highway tags, such as secondary, tertiary, or residential) c. Three additional features with detailed tagging (see the screenshot below to locate these features). Please apply the following tags: i. School
Amenity = School
Name: Red School ii. Shop
Name: Red Shop
Opening Hours = 7-11
Wheelchair accessible = yes iii. Soccer Field
Leisure = Soccer pitch (or pitch)
Sport = Soccer
Name: Green Fields
Surface = Artificial Turf
Save your edits to the data layer (using the following format “JOSM_YM_yourname”).
Remember: Do NOT upload the contents of your edited file to OSM. This file is for demonstration and grading purposes only.
Not everyone’s attempt for this assignment will look exactly the same, but your submission should look close to the example below. REMEMBER:
Buildings should be squared
ALL features should be tagged (even if it’s just building = yes)
Road features should NOT be angular and messy, but should honorably follow the centerline of the road on the imagery provided
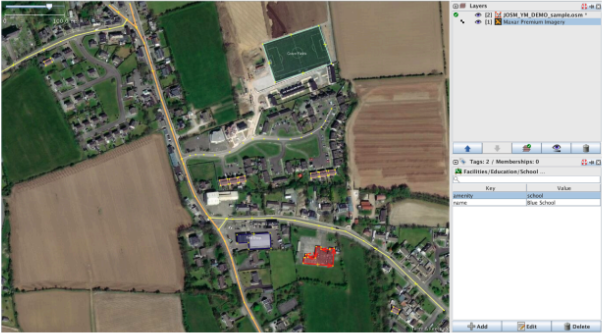
Example of a fully edited submission with imagery Note: The field, school, and shop should be the same, the roads and basic buildings can be of your own choosing.
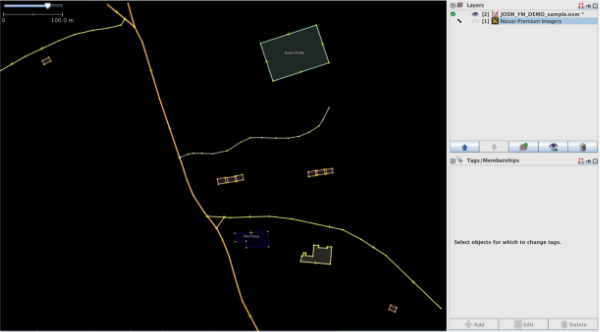
Example of a fully edited submission without imagery Note: The field, school, and shop should be the same, the roads and basic buildings can be of your own choosing.
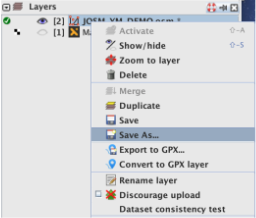
To save the edits to your layer file, right-click on the layer in the Layer menu and select Save As. Save your changes to a file with the following naming convention: JOSM_YM_”your name”.osm (e.g: JOSM_YM_JaneSmyth.osm)
Tip
Save your version of the file after you make your very first edit. Continue to right-click and save regularly while editing.
7.10. Conclusion#
7.10.1. Skills, Proficiencies, and Standards#
Each badge awarded as part of the YouthMappers Academy has been aligned to the skills and proficiencies outlined in the U.S. Department of Labor’s Geospatial Technology Competency Model (GTCM), as well as National Geographic’s National Geography Standards.
The Geospatial Technology Competency Model identifies the foundational, industry-wide, and industry sector-specific expertise that distinguishes, and binds together, successful geospatial professionals. It identifies core personal, academic, and workplace competencies, as well as sector-specific geospatial knowledge and abilities, including specialized competencies related to data acquisition, data analysis and modeling, imagery interpretation, and software and application development.
The National Geography Standards are benchmarks of geographic literacy to determine a comprehensive understanding of the interaction of space and place, and the skills to analyze and critique these dynamics. These standards are measured through knowledge and mastery of three things: (1) factual knowledge; (2) mental maps and tools; (3) and ways of thinking.
The Geospatial Technology Competency Model
Interpersonal Skills:
Demonstrating the ability to work effectively with others, through interaction with peers and course moderators
Professionalism:
Demonstrating commitment to the values, standards of conduct, and well-being of one’s profession
Know codes of ethics and rules of conduct; legal, ethical, and business aspects of data sharing
Initiative:
Demonstrating gumption at work/school
Dependability and Reliability:
Displaying responsible behaviors at work/school
Lifelong Learning:
Displaying a willingness to learn and apply new knowledge and skills
Reading:
Understanding written sentences and paragraphs in work-related documents
Geography:
Understanding the science of place and space; geographic skills
Science and Engineering:
Knowing and applying the principles, rules, and methods of science and engineering to solve problems; subject-specific scientific knowledge
Basic Computer Skills:
Using a computer and related applications to input and retrieve information; navigation and file management and internet and e-mail
Planning and Organizing:
Planning and prioritizing work to manage time effectively and accomplish assigned tasks; planning and organizing; adaptability and flexibility; time management
Data Quality:
Accuracy, resolution, precision, fitness for use; quality control versus quality assurance; data quality implications of legacy systems
Geographic Information Systems:
Conceptual foundations, including representation and uncertainty; digitize and georeference paper map or plate; acquire and integrate various data types in GIS database
Software and Application Development:
Evaluate open source software
Working with Tools and Technology:
Selecting, using, and maintaining tools and technology to facilitate work activity
The National Geography Standards:
1. The World in Spatial Terms:
a. How to use maps and other geographic representations, geospatial technologies, and spatial thinking to understand and communicate information
b. How to analyze the spatial organization of people, places, and environments on Earth’s surface
2. Places and Regions:
a. The physical and human characteristics of places
3. Environment and Society:
a. How human actions modify the physical environment;
b. How physical systems affect human systems
4. The Uses of Geography:
a. How to apply geography to interpret the past
b. How to apply geography to interpret the present and plan for the future
Knowledge Checks
To test your knowledge, complete the following test:
If you receive a score of 80% or higher, you will receive an email with a certificate for this module.